Converting HEIC Photos: A Comprehensive Guide for iPhone and Windows Users
In 2017, Apple rolled out a new image format for its iPhone users known as HEIC (High Efficiency Image Container). While this format offers numerous advantages such as reducing storage space compared to JPG and enhancing features like Live Photos and sophisticated image editing, it can pose compatibility challenges at times.
HEIC photos work seamlessly across Apple devices, but issues arise when trying to upload them to online platforms or open them in Windows. In such cases, compatibility issues can create frustration.
There are several solutions to this dilemma. One option is to convert your HEIC images to JPG format directly on your iPhone. Alternatively, you can modify your settings to use JPG as the default photo format. If the images are already located on a Mac or Windows computer, various methods are available to manage them effectively.
The following are effective methods to convert HEIC images to JPG, or alternatively, access your HEIC photos.
Modify Your iPhone’s Default Photo Format

If you prefer not to use HEIC format, the initial step is to change your iPhone’s Camera app settings to JPG. Go to Settings > Camera > Formats and select the “Most Compatible” option. Doing so will ensure that all new photos are saved as JPGs, which are more widely supported for sharing.
Additionally, there is an option in settings that allows for automatic conversion to JPG when sharing images with Mac or Windows devices while retaining HEIC format on the iPhone, thus saving storage space. Activate this by navigating to Settings > Photos > Transfer to Mac or PC and selecting the “Automatic” option.
Batch Conversion of HEIC Images Using Quick Actions on Mac

On Macs running macOS Monterey or newer, a handy image conversion tool is incorporated into the Finder app, enabling conversion of multiple images at once. Select the HEIC images, right-click, and choose Quick Actions > Convert Image. Then, select the “JPEG” format and proceed by clicking on “Convert to JPEG“.
Image Conversion Using Preview

If utilizing an older Mac version without the Quick Actions feature, the Preview app can still be used for HEIC to JPG conversion. Simply open the desired image in Preview, navigate through File > Export, select JPEG as your format, and hit Save to generate a new file in the same directory as the original.
Bulk Export HEIC Images via Photos App
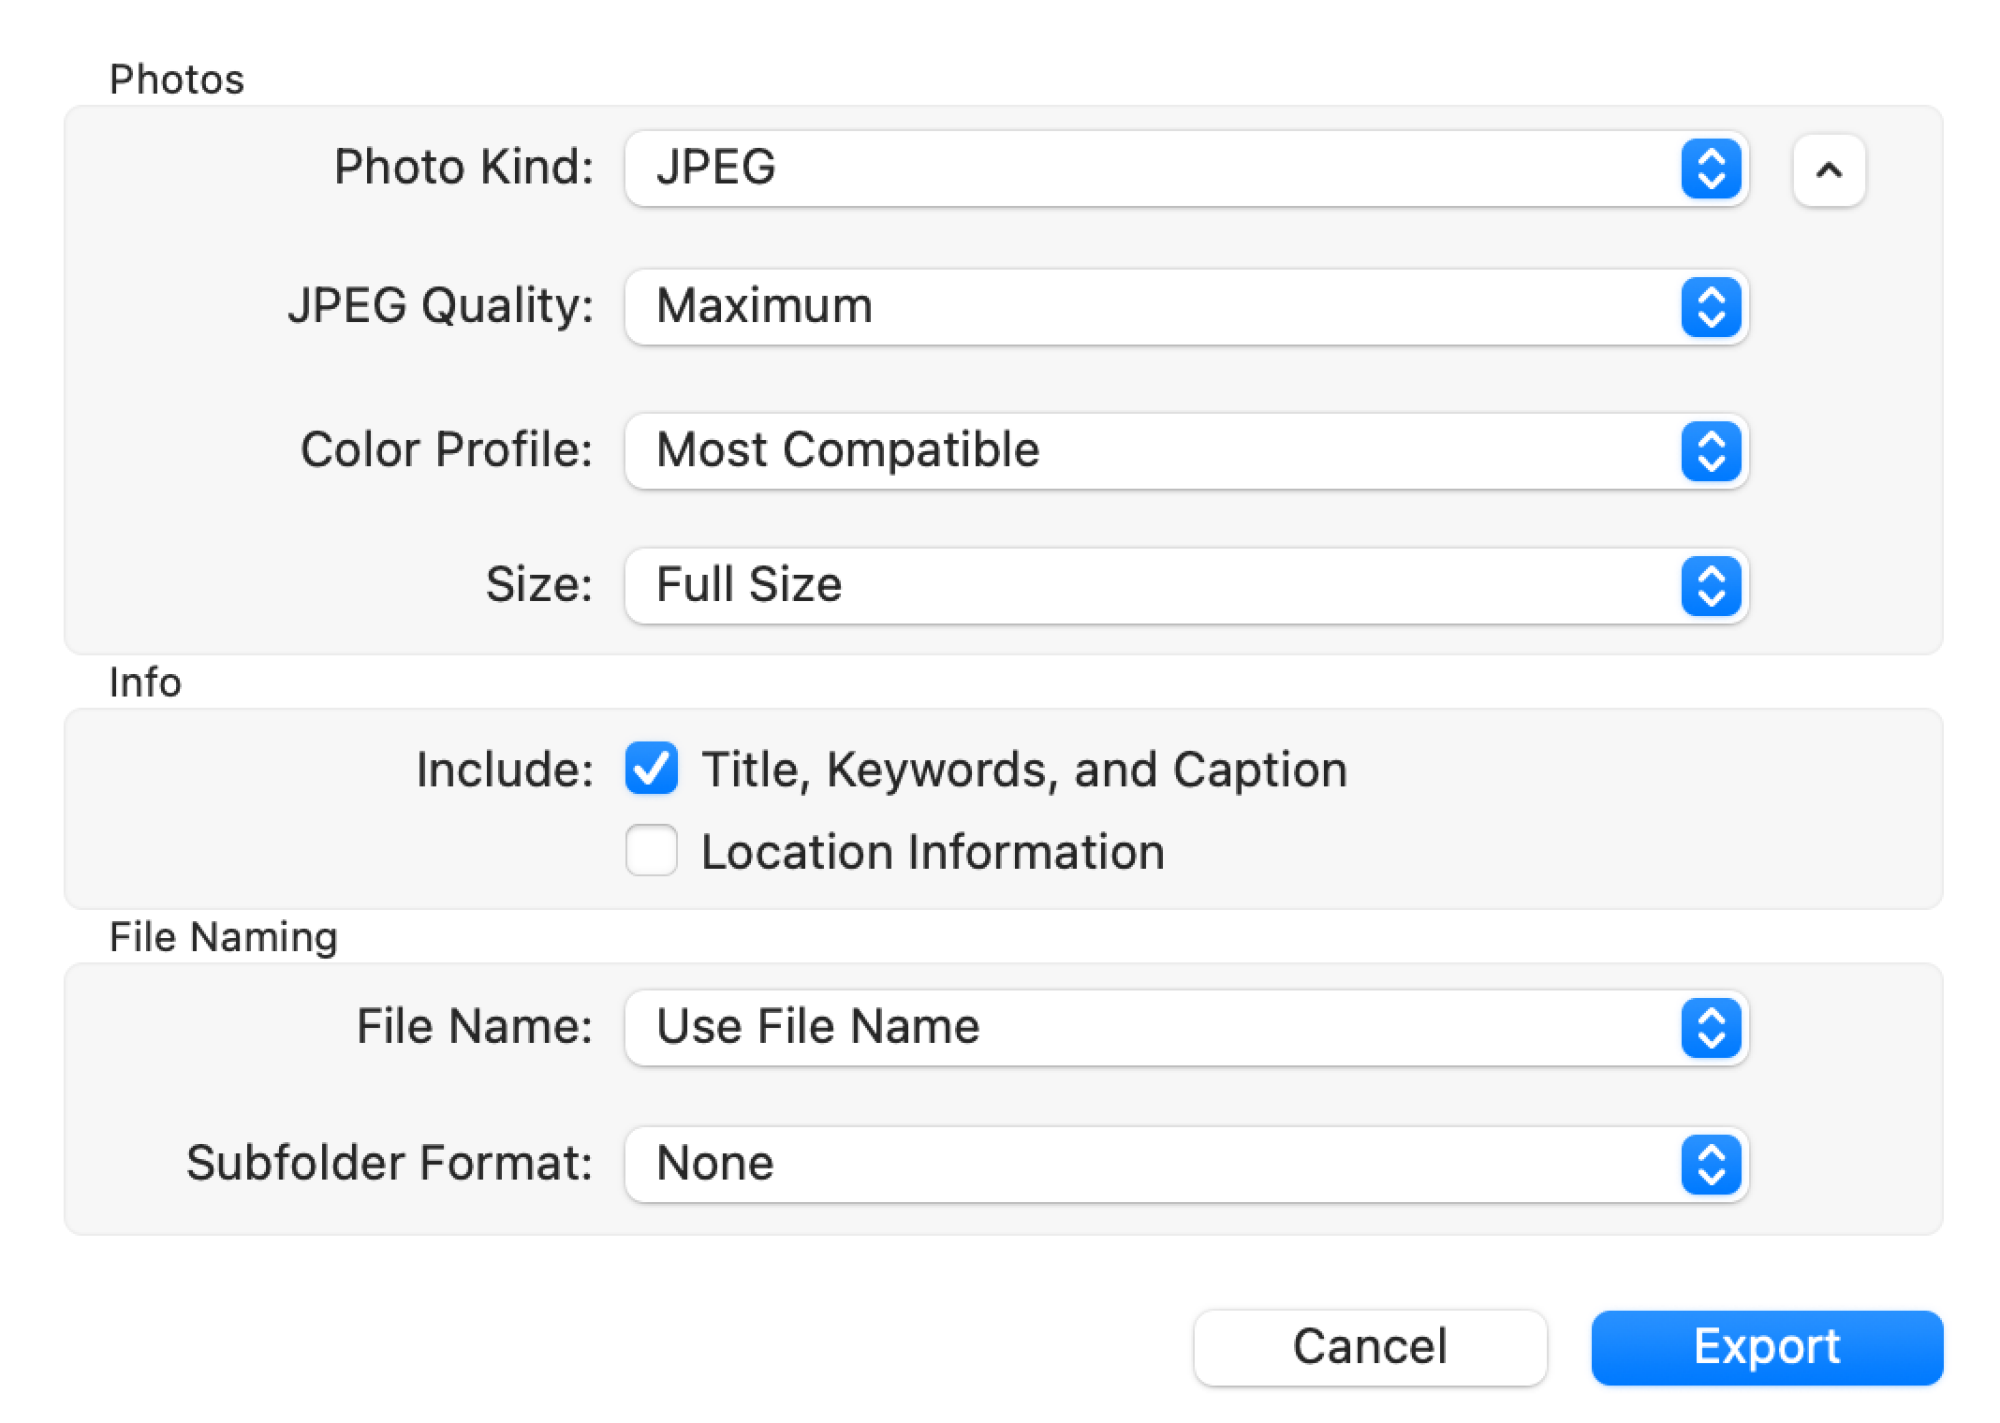
The Photos app on Mac conveniently syncs all photos from your iPhone via iCloud, though they remain in HEIC format. Fortunately, exporting these images is straightforward. Select the desired photos, click on File > Export > Export [X] Photo(s). Ensure to choose the JPEG format before clicking Export.
You can also drag and drop images directly from the Photos app onto the desktop or any location within Finder to automatically convert them into JPEG format.
Instant HEIC to JPG Conversion Using the Files App

A swift route to convert HEIC files to JPG directly on your iPhone is through the Files app. Open Photos, select the images for conversion, tap on the Share icon, and select the “Save to Files” option.
Navigate to the Files app, locate the saved image, press and hold it, go to Quick Actions > Convert Image. Select the JPEG format and then choose the size, generally recommended to be Original. This method supports batch conversions, streamlining the process.
Accessing HEIC Images in Windows Photos App
Windows offers support for opening HEIC images in its Photos application, but this functionality is not available out of the box. To enable this feature, you will need to install the HEIF Image Extensions (free) as well as the HEVC Video Extensions (priced at $0.99). Once installed, users can open HEIC files in the Photos app and convert them into JPG format.
With these extensions, open your HEIC images using the Photos application and convert them into JPG by accessing Three dots menu > Save as > Save as type > JPG. Additionally, HEIC files can be opened in Paint, where you can navigate to File > Save as > JPEG picture to convert them as well.
Using Clop for Mac to Automate HEIC Conversion from Downloads
For every challenge, there’s a solution in the form of software. Clop is a utility designed to handle various image and video file formats with ease. After installation, Clop automatically converts any HEIC images downloaded or transferred to JPG format, streamlining the process, especially when handling WebP images online or receiving HEIC files via AirDrop.
Once installed, access Settings > Images > Watch Paths, then add /Downloads. This setup permits automatic conversion of airdropped HEIC files into JPG upon transfer to your Mac, enhancing efficiency and user experience.
Right-Click Conversion of HEIC to JPG on Windows Using CopyTrans
Another viable option is the popular CopyTrans for Windows, which simplifies the process of converting HEIC images to JPG. This application is free for personal use and integrates directly with Windows File Explorer. By selecting the HEIC file, right-clicking it, and choosing “Convert to JPEG with CopyTrans“, users can effortlessly create a JPG version in the same folder as the original file.
Leveraging Online Services for HEIC Photo Conversion
If the task at hand is to quickly convert a few HEIC images without the hassle of installing apps, there are numerous free online image conversion services available. A trusted option is Cloud Convert. Simply drag and drop your HEIC images, click the “Convert” button, and download the resulting JPG files in moments.