Meta’s Changing Landscape: Exploring Your Options for Leaving Instagram
This week, Meta, the corporation behind popular platforms like Facebook, Instagram, and WhatsApp, made headlines by announcing a reduction in its fact-checking initiatives. Instead, they are opting for “Community Notes,” which they claim will bolster free expression on these platforms—at least according to Mark Zuckerberg. However, critics argue this move may compromise measures against hate speech, especially when it includes controversial assertions regarding the LGBTQ community. Additionally, both Instagram and Threads plan to increase the visibility of political content in user feeds, whether users appreciate it or not. This shift has sparked discontent among a segment of the user base.
If these adjustments to policies have sparked concerns, or if you’re simply aiming to adhere to your resolution to reduce social media usage, you may be considering stepping away from Meta’s platforms. The most definitive choice is to delete your account, but if that feels too final, deactivating your account lets you take a temporary hiatus while maintaining the option to return.
This guide will outline what you need to keep in mind before making your decision, along with the steps needed for both account deletion and deactivation.
Before Deactivation or Deletion: Back Up Your Data
Before diving into the deactivation or deletion process, here’s an essential tip: be sure to export your Instagram data first.
To do this, go to your profile and tap the three-line menu located in the upper-right corner on mobile devices or in the lower-left on desktops. Select “Your activity,” scroll down, and click on “Download your information.” On the next pages, you’ll be prompted to specify which Meta accounts you wish to download data from. If you also have a Facebook or Threads account, for example, you’ll see options for those as well.
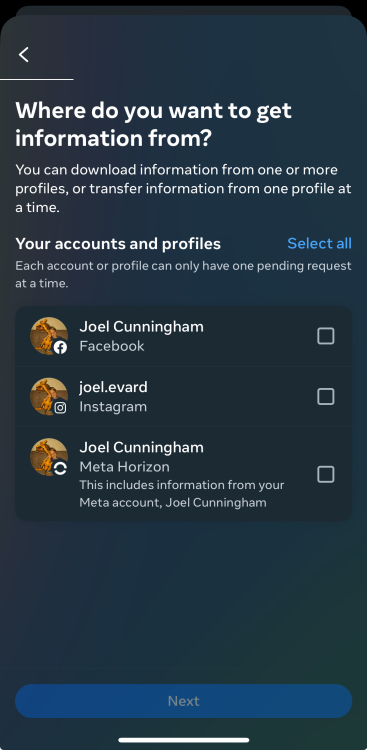
Next, choose whether to download “All available information” (this means all your images, comments, etc. apart from photos in which you’ve been tagged on others’ accounts) or “Some of your information,” which allows you to select specific items to save.

You can then specify a date range for your download. If you want everything, simply select “All time.” Additionally, choose “Notify” to indicate where you’d like to receive the download link. You will need to pick from the email addresses associated with your account. You’ll also have the option to select the “Format” for your data—either HTML, which allows you to view it offline as it appears online, or JSON, which is more suitable for data migration to other platforms.
Even if deactivation is your choice, keeping a backup of your data is beneficial in the event of unexpected account issues and allows you to reminisce while your account is inactive (or particularly if you decide to delete it later).
Steps for Account Deactivation on Instagram
Now, let’s delve into the deactivation procedure. Using the same three-line menu, select “Accounts Center.” After that, click on “Personal details,” followed by “Account ownership and control.” You will then find a button labeled “Deactivation or deletion.”

You may encounter multiple account options if you have linked various accounts to your main one. For instance, if you have a personal Facebook, an anonymous Instagram, and your main Instagram account, you can pick the one you wish to deactivate.

By deactivating, your username will be absent from public view. It’s common for individuals to do this periodically, only to reactivate their accounts when they feel ready. When you deactivate, your follower count will decrease, but no notifications will be sent out to inform them of your departure.
Once you deactivate your account, it becomes unsearchable. Others will perceive that you no longer exist on the platform. Nevertheless, you can log back in at any point to reactivate your account, including all past posts. If you want a brief intermission from the app or are uncertain about deleting it completely, this approach is ideal.
Procedure for Deleting Your Instagram Account
The steps to delete an account are fundamentally the same as those to deactivate one. Return to the three-line menu you utilized for data downloading and select “Accounts Center.” From there, proceed to “Personal details,” followed by “Account ownership and control.” You will encounter the “Deactivation or deletion” button.
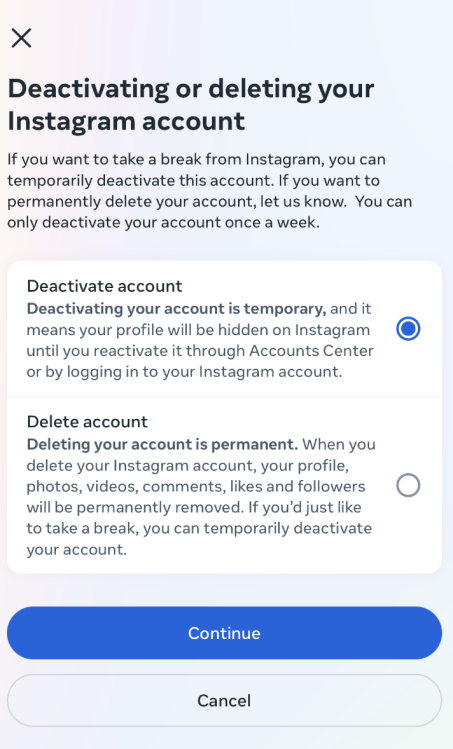
Upon deletion, recovering your account will not be possible. Your username will become available for others to claim. All your photos, videos, direct messages, saved posts, archived materials, and highlights will be lost. This is an irrevocable step towards a clean slate. Farewell, best wishes for enhanced mental wellness, or at least for more free time in your life ahead.