Upgrading to Windows 11 on Unsupported PCs: A Comprehensive Guide
As the end of Microsoft’s complimentary updates for Windows 10 approaches, numerous users find themselves unable to transition to Windows 11 despite having capable hardware. This is largely due to Microsoft’s strict system requirements launched with the new version of Windows, among which the most notable is the necessity for TPM 2.0 support. This tiny chip, known as a Trusted Platform Module, aids in enhancing device security and encryption tasks. Unfortunately, many users possess older models lacking this chip or robust gaming rigs that do not include TPM. Officially, these systems are excluded from the Windows 11 upgrade. However, for those affected, there exists a workaround to bypass TPM checks and enable installation.
Risks Involved in Upgrading an Unsupported PC to Windows 11
It is crucial to recognize from the outset that upgrading extremely low-performance computers to Windows 11 is inadvisable. Microsoft mandates a minimum of 4GB of RAM and 64GB of storage for installation; if your system’s specifications fall below these figures, the upgrade should be avoided. This guide primarily targets those whose machines are perfectly functional yet hindered by TPM constraints.
The rationale behind Microsoft’s push for TPM 2.0 is rooted in security enhancements. Devices equipped with a TPM chip are better fortified against malicious software and ransomware attacks, allowing for safer local storage of sensitive information. However, bypassing this requirement may lead to potential compatibility issues and performance setbacks, as warned by Microsoft. In addition, users may find themselves without support from the company, with warranty claims voided for any resulting damage.
For those whose devices are still within the warranty period, refraining from making unsupported upgrades is advisable. Nevertheless, if a warranty is no longer applicable, it may be worth considering the upgrade to Windows 11, especially since Microsoft plans to cease providing free security updates for Windows 10 by October 14, 2025.
Consequences Following the Final Windows 10 Security Update
Post the release of the last security update, refrain from connecting the PC to the internet. Doing so exposes the device to new vulnerabilities, malware, and other online threats, as security patches will no longer be available.
There is an option to subscribe to Microsoft’s Extended Security Updates (ESU) program, but this could be costly, with initial fees of $61 per device for the first year, doubling in cost with each subsequent year. However, if associated with an educational institution, the fee is significantly lower, starting at $1 per year and rising to $4 by the third year.
Conversely, if you hold a valid Windows 10 license, upgrading to Windows 11 is a no-cost option that promises years of free security updates.
Steps to Upgrade Your Unsupported PC to Windows 11
Before initiating the upgrade process, it’s vital to back up all essential data. Ensuring that all your files, including photos, videos, and documents are securely saved is a critical step in this process.
Once you have successfully backed up, you may begin the upgrade. The first step is to download a Windows 11 ISO from Microsoft’s site. Navigate to the section labeled Download Windows 11 Disk Image (ISO) for x64 devices, select the desired edition from the dropdown (generally the latest version), and click on Download Now. Follow the prompts and select 64-bit Download when prompted. The ISO file will exceed 6GB and will take a while to download.
While your ISO is downloading, obtain the latest version of Rufus, a free utility for creating bootable USB drives. Alternative methods for upgrading will be discussed, but this method is among the easiest and most effective. Ensure to use the latest version of Rufus since Microsoft often updates their systems to block previous bypass methods. For this operation, a USB drive with at least 8GB of available space is necessary, so it’s prudent to back up any important data on the USB drive, as it will be wiped clean.
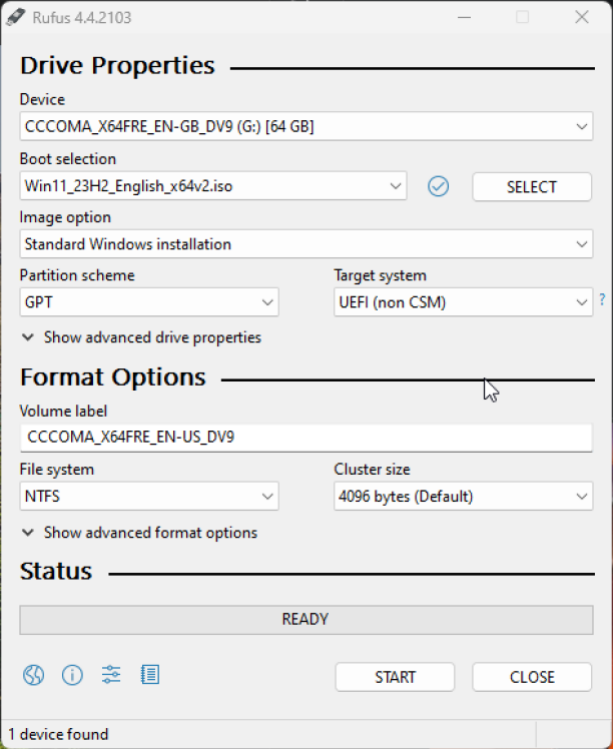
After downloading the Windows 11 ISO, connect the USB drive and launch Rufus. Once opened, select your USB drive from the Device dropdown menu. Hit the SELECT button next to Disk or ISO image and select the Windows 11 ISO you downloaded earlier. Finally, click START.
A pop-up will appear, asking if you wish to customize your Windows installation. It is advisable that you enable the following options:
- Remove requirement for 4GB+ RAM, Secure Boot, and TPM 2.0
- Remove requirement for an online Microsoft account
- Create a local user account
- Disable data collection in setup
Of these options, the first is indispensable for installing Windows 11 on unsupported systems. The others can streamline the installation process by bypassing online account prompts and reducing privacy questions. Once these selections are made, click OK and wait for Rufus to complete the setup.

After Rufus completes the process, it is essential to confirm that your data is adequately backed up. The upgrade can now commence. There are different ways to proceed: the simplest is to open the bootable USB drive and run the Setup.exe file, guiding you through the Windows 11 installation steps.
Alternatively, one may choose to boot directly from the USB drive to initiate the installation. Start your PC, navigate to Settings > Update & Security > Recovery, and select Restart now under the Advanced startup section. This action opens the Windows 11 setup process from the USB drive.
Utilizing this method successfully led to a smooth upgrade experience, though it is critical to remove all USB drives (including the Windows 11 USB) when the computer restarts for the first time; otherwise, the installation could freeze. Fortunately, the upgrade went without any major obstacles, and the process recognized and activated Windows 11 without requiring a product key, directly updating from the Windows 10 Pro license.
Alternative Method 1: Registry Key Modification
If Rufus doesn’t yield results, several other approaches exist for upgrading unsupported PCs to Windows 11.
Recently, Microsoft removed the instructions for a registry key modification that allows users to bypass TPM checks for installing Windows 11. The option may no longer be visible in official support documentation, but it remains functional through the following steps:
- Launch the Registry Editor on your Windows 10 device.
- Go to HKEY_LOCAL_MACHINE\SYSTEM\Setup\MoSetup.
- Create a new registry key with the following specifications:
- Name: AllowUpgradesWithUnsupportedTPMOrCPU
- Type: REG_DWORD
- Value: 1
Although Microsoft may eventually disable this method, it remains a viable option in the meantime.
Alternative Method 2: Automating the Windows 11 Installer
Another tactic involves creating an unattended Windows 11 installer, facilitating the upgrade even for machines deemed ‘unsupported.’ This method automates the installation, permitting various configurations, including the removal of unnecessary software and alterations to taskbar settings. Follow these steps:
- Visit the Unattend Generator website.
- Choose Install Windows 11 Using These Language Settings and specify your desired language, keyboard layout, and country.
- Select the processor architecture that aligns with your computer specs—options include Intel/AMD 32-bit, Intel/AMD 64-bit, or Windows on Arm64. If uncertain, check your architecture through Settings > System > About on your device.
- In the Setup Settings section, ensure to select the option bypassing TPM checks.
- Proceed through the remaining options, deciding whether you prefer automatic or manual partitioning, the removal of unneeded applications, and setting preferences for your operating system.
- Once your choices are finalized, scroll down and click Download .xml file to download the autounattend.xml file to your device.
- Create a bootable Windows 11 USB drive by accessing the Microsoft Windows 11 download page and finding the Create Windows 11 Installation Media section. Click Download Now, execute the Media Creation Tool, and follow the instructions.
- Transfer the autounattend.xml file to the USB drive, boot from the USB, and proceed with the installation process.
This approach will facilitate upgrading your unsupported PC to Windows 11 while also applying your preferred settings throughout the installation.